Making a Mask or Shield
There are many commercial and homemade DIY shields that protect from the spray from an infected person, as well as will act as a barrier to touching your face.
Looking on youtube with the links https://www.youtube.com/results?search_query=make+mask+visor and https://www.youtube.com/results?search_query=diy+face+shield will bring up many suggestions.
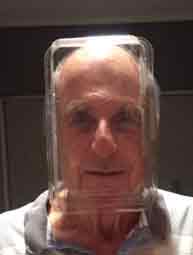
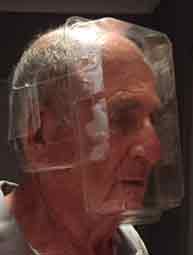
See also instructions below for making a homemade shield from items found in most kitchens that can be washed and sterilized for multiple uses and do not require breathing through a suffocating cloth mask. This shield stops your hands touching your face including your chin, enabling you to remove it without your hands contacting your head.
Commercial shields are not designed to prevent chin and head touching.
Anything that helps keep your hands off your face must be of benefit, and that is the best reason to wear a full face shield, especially one that stops your hands touching your face, especially when removing it. A full-face shield that has side pieces that prevent your hands also touching your hair and head would be the best.
A DIY mask, while not as effective as an N95 mask, still offers some protection from respiratory droplets from someone coughing or sneezing close to you.
Fabric that is 100% cotton is comparable to surgical masks.
If you can't make your mask, the New York City Department suggests covering your mouth and nose with a scarf or bandanna.
There is no conclusive evidence whether the tiny drops generated from breathing and even coughing containing coronavirus remain suspended for any time. A face mask is both of use as protection against inhaling the virus and preventing spreading.
If the drops do not remain suspended for much time, as claimed by the World Health Organisation - WHO - a mask will help stop the normal wearer from spreading, but only a shield stops the wearer touching contaminated surfaces and then touching their face.Medical personal in close contact with COVID-19 patients must wear at least the N95 mask, plus a medically approved face shield.
To make a shield for yourself, friends or family with materials found in almost every home and office, see the below instructions.
The Face Fender (©)
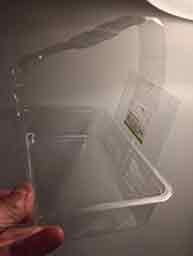
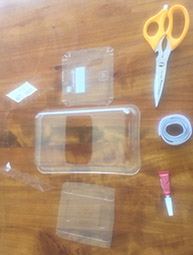
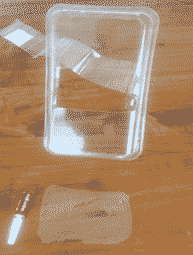
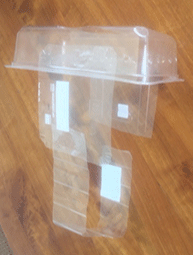
You can make this shield/mask quickly at home from cleaned used plastic food tray parts, glue and a few small pieces of Velcro.
- Clean a food tray about 23cm by 15cm wide by 5cm deep (9" x 6 x 2 inches).
- Since food trays are not fully translucent, to see clearly you will need to cut a slot about halfway along tray's base about 9 cm (3.5") across by 2 to 3 cm (1 inch) deep. You may wish for extra safety cover this slot later with some cellophane lying around or from some inner food packaging.
- So that your breathing is not limited punch a few small, about 4mm, holes along the short end of the tray which will be the part under your chin.
- Since the main purpose of the shield is to prevent face touching, to increase airflow, you may want to punch more holes along the shield's side. You might even cut a few slots along the side, but nothing wider than a finger. Of course the more air holes, the slightly greater chance of your droplets escaping.
- If you do not have a sharp instrument to cut or punch these holes, heat the end of a screwdriver or similar on the stove, then carefully use the hot metal to punch through the It is highly unlikely that saliva or droplets will be able to fall onto another person from these holes unless you make too many.
- cut two flat pieces from other trays to about 10 to 15 cm almost square to be added to the sides so that you do not touch your ears or hair when fitting or removing the shield.
- Glue the two side pieces to the sides of the face shield, and allow to dry.
- Cut a strap, being a strip about 33 cm (13") long by 50 cm (2") wide from the side of a tray, maybe the one from which you cut a sidepiece.Add the loop Velcro to both ends of the strap (or glue one end) and Velcro strap to a matching place on the side pieces.
- If you cannot find Velcro because the shops are closed, you can make a strap out of elastic or strings.
- Close the gap you made for your eyes if required by gluing some cellophane over the slot.
- Put the shield over your face, then close up the strap to hold it in place.
- Go boldly when few have gone before, into the open world.
- If you remove the shield before getting home, place it in a plastic bag to prevent the transfer of germs to your clothes or car.
- When returning home wash your hands in case you touch your head, then remove the shield and wash in warm soapy water, or wipe with antiseptic or alcohol both inside and outside.
- Also wipe or spray everything you have brought into the home with alcohol, including your head and hair.
The main idea of this shield is to prevent your hands touching anywhere on your head, including the sides and your chin. However, it would give good protection for both wearer and surrounding parties against sneezing, coughing and hypersalivation or spitting when talking.
Should there be any scientific testing to determine it as a protection against various germs, it will be shown here.
Advantages of the Face Fender Protective Shield
- You will not need to touch your face or head to put it on.
- It can be easily sterilized by wiping with antiseptic or dropping the whole shield in warm soapy water for several minutes.li>
- Best stored out of the way on a high hook.
- It can be made cheaply using a plastic food container.
- It is not claustrophobic like a piece of material over your mouth.
- It can be worn with a medical mask if wanted.
- It protects the eyes and can be designed to cover all or most of the head.
- It can be made for all sizes.
(©) Bernhard Kirschner, design free to use for personal and non-profit community use. For commercial use, please contact: info@preventing-coronaviruses.com
